![]()
Technical reference page: 25
Agribuggy 2D/3D - Fan wiring modification
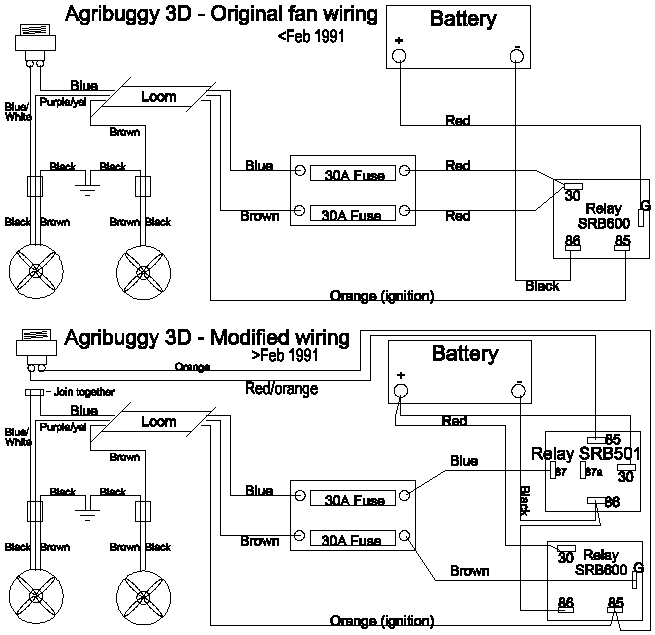
Due to a specification change on the thermostatic fan control switch on the XLD418 engine, it has been found that in certain operating conditions, where the second fan is cutting in frequently, the switches have been proving unreliable. To rectify the problem a change to the wiring system has been made to machines produced from February 1991 onwards and a conversion kit made available for machines that have suffered switch failure. The new system significantly reduces the electrical current load on the fan switch by the fitting of a second relay to switch the current to the second fan.
Fitting instructions
1. Remove 2 wires
from 2nd fan switch - situated underneath the thermostat housing.
Join the two wires together (blue & blue/white) and tape up to
protect from corrosion.
2. Turn the
ignition switch on. At this stage both fans should run together. Turn
switch off.
3. Fit wiring loom
supplied between the battery box and the fan switch. (2 wires - red
& red/orange)
4. Connect the red
and red/orange wires to the fan switch.
5. Disconnect the
battery, remove and discard the red power feed wire from the battery
to the fan relay.
6. Remove and
discard the two red wires that connect the fan relay and the two-way
fuse box.
7. Fit the new
relay supplied next to the original relay.
8. Connect the
red/orange wire in the new loom to terminal no. 85 on the new relay.
9. Remove orange
wire from old relay and connect orange wire from new loom onto term.
no. 85 on old relay, then re-connect told orange wire onto the
piggy-back connection.
10. Fit black
earth bridging wire between terms 86 on each relay with the original
battery earth piggy-backed onto the old relay.
11. Fit black
earth bridging wire between new relay terminal 87 and fan fuse box.
(Ensure any bridging links are removed from fuse box if fitted).
12. Fit brown wire
supplied between old relay terminal G and fan fuse box.
13. Fit new
battery feed wire supplied from battery to terminals 30 on each relay.
14. Test the
system as follows:
Disconnect 1st fan
motor, run engine at approx. 320 rpm, the front fan should cut in
after a short period ( at approx. 95 degrees on temperature gauge)
and run for approx. 1 min. and then cut out again.
The warning light
should come on whilst the fan is running.
Ensure engine
does not overhead whilst testing.
KEEP CLEAR OF
BOTH FANS WHEN INGNITION IS SWITCHED ON.
NB A second SRB501 relay can be used in lieu of the original SRB600. The terminal numbers are the same other than the one marked G on the SRB600 - this is equivalent to terminal 87 on the SRB501