| Back to Tech
index |
|Manual Index|
THE FRAZIER
DEMOUNTABLE SPRAYER FOR THE FRAZIER CHASSIS UNIT
OPERATORS
INSTRUCTION MANUAL20 - 28m ALUMINIUM BOOM MODELS
MANUFACTURED BY:
T.J. FRAZIER LTD. The Airfield, Seaton Ross, York. YO4 4NF.
Tel. Melbourne (01759) 318703 FAX: 318769
THIS MANUAL SHOULD BE
KEPT WITH THE MACHINE AT ALL TIMES AND SHOULD BE READ BY ALL
OPERATORS BEFORE OPERATING
After reading
this manual and becoming acquainted with the Frazier tractor unit
(see appropriate manual) and the sprayer, it is recommended that
you fill the sprayer with clean water only and have a trial run
in a grass or stubble field. It is important that you get used to
all aspects of operating, calibrating and cleaning out the
sprayer before applying chemicals.
Revised January 1998 - Applicable
to machines manufactured from January 1998 onwards.
© T.J. Frazier January 1998.
Issue 3
Table of contents
| Introduction Operating - the
spraying system The booms |
3 3 4 5 6 6 8 8 9 11 12 14 15 15 16 16 18 18 19 19 20 20 20 |
Maintenance and technical information |
21 21 22 22 23 23 24 24 25 25 25 25 26 26 26 27 27 27 |
The Frazier demountable sprayer
has been designed specifically for the Frazier range of
self-propelled low ground pressure vehicles. The sprayer is built
to varying specifications depending on the customer requirements,
although the operation is basically the same for all models.
This instruction manual
concentrates on the standard sprayer designed for the Frazier
chassis unit (1998 specification). Information on non-standard
booms, sprayer controls etc. are available on request.
The machine identification/serial
no. should have been filled in at the front of this manual before
you received your new sprayer, if not please fill it in now. It
can be found on the spray pump mounting plate. You will find it
useful for future reference particularly when ordering spare
parts.
Whilst every precaution is taken
in selection of materials and components used in the manufacture
of their machines to ensure maximum resistance to corrosive and
clogging effects, T.J. Frazier Ltd. cannot accept liability for
any damage to machines of their manufacture, or any possible lack
of efficiency, resulting from the improper use of the sprayer or
chemicals, or the use of unsuitable spraying materials.
T.J. Frazier Ltd. cannot accept
any liability for damage to their machines, or third parties, any
accident, injury, or any other occurrence resulting from the
incorrect use or maintenance of the machine.
T.J. Frazier Ltd. reserve the right to alter specifications as and when necessary without prior notice.
For your own and, more importantly, other people's safety please read
this section carefully
and remember the points made.
If our service engineers are
called out to work on the machine, or if the machine has to be
returned to our works for repair, it must be thoroughly
decontaminated and cleaned both internally and externally,
removing all chemical residues to enable the work to be carried
out safely and effectively. If the machine is not clean, we
reserve the right to either refuse to carry out the work or to
charge for any necessary cleaning.
The Control of Pollution Act, The Health and Safety at Work Act, the Poisonous Substances in Agriculture Regulations, The Food and Environment Protection Act, The code of Practice for the Use of Pesticides on Farms and Holdings 1990 and The Control of substances Hazardous to Health Regulations.
Operating
| Sprayer on/off The main sprayer on/off switch is situated in the lower left corner of the sprayer control panel (Fig. 1) Push the switch down to start spraying and up to stop spraying. This switch is normally connected to the RDS area meter to stop area being accumulated whilst turning on headland. It is also connected to the four wheel steering system (if fitted) and (if selected) automatically activates four wheel steer when spray lines are switched off, e.g. when turning. Pressure control The spraying pressure can be altered from the sprayer control panel (fig. 1), Push the switch up to increase pressure and down to decrease pressure. The pressure can be monitored with the pressure gauge mounted in front of the cab windscreen. If an automatic controller
is fitted it must be switched to manual mode along with
the additional pressure selector switch. . |
Fig.1 Main sprayer control panel |
Boom section controls
The sprayer will be fitted with a
4 or 5 section spray line control.
To stop an individual boom section
spraying push the appropriate switch to off and to start it again
push the switch to on. Warning lights next to the boom section
switches will indicate whether a section is spraying or not (fig.
1), the master on/off switch will override all the boom section
controls.
The boom section switches may be
connected to the RDS area meter for more accurate acreage
recording if an "Area Compensation Interface" is fitted
(see tractor unit manual).
Bout marker control
If a factory fitted bout marker is
fitted, it is operated by a two way switch on the sprayer control
panel (fig. 1). Depress the switch to the left to activate the
left hand side, and to the right for the right hand side. Warning
lights next to the switch indicate which side is in use.
PTO controls.
Please see tractor unit manual for details on the PTO system.
NB. Please remember it is recommended that the PTO be run at as low a speed as possible with
sprayers that are fitted with high
capacity pumps. i.e. 320 rpm for 5/6 cyl pumps & 400 rpm for
4 cyl pumps. (see tractor manual for more detail)
![]()
Operating
Valve A.
| Water fill The self fill hose is connected
using a quick release cam type coupler. Always use the
hose supplied with the machine or one that is fitted with
a non-return valve. Do not fill the sprayer direct from
open waters. To fill the sprayer ensure the master spray
control switch is Off, the spray pump is running,
set valve A to water fill and valve B to fill/spray. Spray / Circulate Turn valve A to clean water to draw from the wash tank. This can be diverted through the tank wash, the chemical inductor or spray ports, depending on the position of valve B. |
fig 4. Valve A |
| Valve B. Spray / fill / circulate This is the normal running
position for valve B during filling and spraying. Chemical inductor To activate the chemical inductor whilst filling, wait until the tank is approx. half full then turn valve B to chemical inductor. |
fig 5. Valve B |
| Tank wash With Valve B set to tank wash
the pressure flow will be diverted to the tank wash
nozzles. NB the pump should only be run at low revs
Whilst tank washing.
Quick fill This is an optional valve enabling the tank to be filled directly from a water bowser.
|
Fig 6. Quick fill valve |
Always check that main on/off switch in cab and chemical inductor valves are turned off before operating valves A, B, or quickfill.
Operating
| A booster
agitator is fitted inside the spray tank for extra
agitation if required. It is recommended that it be used
when spraying chemicals that are held in suspension or
are prone to settling out. It is operated by moving the
valve shown in Fig.
7. The valve in the picture is shown in the on position.
|
Fig. 7 Agitator control valve. |
Boom balance return valves
These are normally only fitted
to machineswithout an automatic spray control.
Whilst spraying, if a boom section is switched off, the flow of water is returned to the tank through its respective balanced return valve. When correctly set these valves ensure that the spraying pressure remains constant no matter how many sections are turned on or off.
They have no effect whatsoever
when all the boom sections are switched on. Each valve only
affects the spraying pressure when its respective boom section is
switched off.
These valves should be re-set whenever you change jets although if you are only changing to a jet one size up or one size down you are unlikely to see a significant fluctuation in the spraying pressure. However, if you are changing from a very small jet to a very large jet and you do not adjust the balanced returns, you will see a marked increase in the spraying pressure when you switch a boom section off.
It is extremely important to ensure that these valves are set accurately if your sprayer is
fitted with the RDS Delta 3/4 automatic controller. If they are not then the actual application rate can vary from the target and indicated rate by a significant amount when you are spraying with one or more sections switched off.
| Setting up NB The valves should only be set
whilst spraying out clean water. 1/ Set sprayer up for
spraying with your selected jets fitted and switch the
sprayer on. 3/ Switch the LH boom
section off and watch the pressure gauge to see if the
pressure alters. 4/ If the pressure increases, turn the LH balance valve anti-clockwise until the pressure drops to the original setting. e.g. 3 bar. |
Fig. 8 Balance valve showing +/- adjuster tap. |
| 5/
If the pressure decreases, turn the LH balance valve
clockwise until the pressure reaches the original
setting. e.g. 3 bar. 6/ Switch the LH boom
section back on again - the pressure should remain at the
original setting. e.g. 3 bar. 7/ Repeat the above
procedure with each boom section in turn until all have
been set. 8/ When you have finished you will find you can have any combination of sections switched on or off and the pressure will remain constant. |
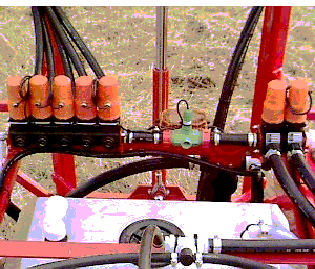 Fig. 9 Control bar showing boom valves. |
|
Once you have set the balanced return valves for different jets a few times you will get to know
how much to adjust them by and will be able to pre-set them without going through this complete procedure. It is quite easy to mark the valves with a "permanent marker pen" to show the positions for the different jets that you use.
The advantage of this system is
that no neat chemical has to pass through the pump and the
"sucking" and "blowing" effect mixes and
disperses liquid and powdered chemicals in the spray tank without
pre-mixing.
The hopper is fitted to a bracket that can be raised and lowered by lifting the catch shown in
Fig. 10. This is particularly
useful when the machine is fitted with high clearance wheels.
A container flushing nozzle is also
built into the hopper (Fig. 11) which can be used to flush out
empty chemical containers with the washings going straight into
the hopper.
| Operating 1. Run the spray pump to at least 320 revs onthe PTO and put at least 200 litres of water into the spray tank. 2. Ensure all the taps on the inductor are initially turned off. 3. Turn main sprayer control valve B. to CHEM INDUCTOR. 4. A flushing ring is fitted around the top of the hopper and can be used to flush the contents down into the venturi. To turn it on, switch the can-wash/flush ring tap on the left hand side of the hopper to the on/up position (fig. 14). |
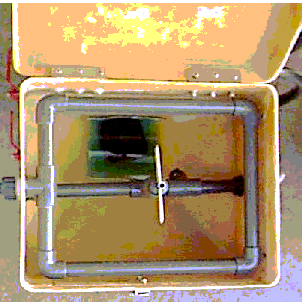 Fig. 11 Can wash nozzle and flush ring. |
| 5. Pour
chemicals or powders into hopper. 6. Turn main tap on inductor to the on position (Fig. 13).
Chemical/powders will then be drawn out of the hopper. 7. To operate the can-wash, the flush ring must also be working then simply invert the empty container and press down on the valve. A jet of water will then be directed into the can. For the best cleaning effect, move the can around so the jet reaches all parts of the can. 8. A flushing hose is also fitted to the hopper to assist cleaning the hopper. A tap is situated on the left hand side of the hopper for this hose (Fig. 12). |
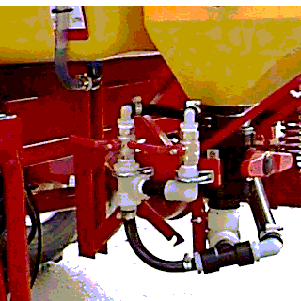 Fig. 12 Auxiliary valves and main induction valve. |
| 9. As soon as the hopper is empty, turn the tap under the hopper to the OFF position. Failure to do so will cause foaming in the spray tank due to the venturi sucking air. This tap may have to be turned on and off several times during the filling and flushing operation or alternatively may be only partially opened to slow down the flow from the hopper. | 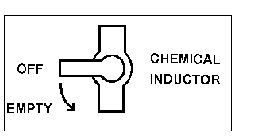 Fig. 13 Main valve positions. |
| 10. When you have finished, turn all taps on the chemical inductor to the OFF position. Turn the main sprayer control valve B. back to the spray/fill position. |
Can wash/flush ring Wash hose Fig. 14 Auxiliary valve positions |
Operating
The optional tank wash system
allows the tank and spray lines to be rinsed out and the washings
disposed of in the field.
If you are changing chemicals and
crops, and there is a potential danger of crop damage being
caused by the tank not being thoroughly cleaned, then it is
recommended that a further full wash is carried out with a
cleaning agent by conventional methods afterwards.
The clean water tanks on all the
sprayers hold 10% of the main tank volume.
To fill the clean water tank,
connect a hose to the small valve to the left of the main control
valves (fig 15). Only clean water should be used.
Recommended procedure.
The following procedure is
recommended to ensure that your crops are not overdosed and you
end up with a relatively clean sprayer using the minimum amount
of water and, of course, minimising the possibilities of any
pollution.
When you spray a field in which
you know you are going to use the tankwash afterwards, the area
of the field where you intend to spray the washings should be
under-dosed by approximately 15%. The area required can be
calculated as follows:
½ wash tank volume ÷ Application
rate (l/ha) e.g. 75 ÷ 200 l/ha = 0.375 hectares.
The easiest way to achieve this to increase your speed by 15%. e.g. from 10 to 11.5 kph.
Choose a smooth area of the field and before setting off reset the trip area meter on the RDS Delta. You can then simply watch the area meter until you have covered the required area
and then slow down again. If you have a variable speed PTO you will need to set it in constant mode. If you have an automatic rate controller you will need to alter either the application rate programmed into the unit or switch it into manual mode.
| Washing the tank 1. As you finish spraying, empty the tank of as much chemical as possible and switch the main sprayer switch off. 2. Turn the main sprayer control valve B to the tank wash position. 3. Turn the main sprayer control valve A to the clean water position. 4. Clean water will then be drawn out of the tank and will be pumped through the rotary flushing nozzles in the tank. Tickover speed is all that is required to operate the rotary nozzles at a high enough speed for a good cleaning action. |
Fig. 15 Wash tank fill valve. |
For the best cleaning effect it is
recommended that the tank and lines be flushed through twice, so
only draw half of the clean water out of the tank for now.
5) Whilst the water is being drawn out of the clean water tank, turn valve B to the chemical inductor position for a few moments to flush clean water through the chemical inductor. Also operate the other valves on the inductor to flush through all the other pipes and then turn valve B back to the tank wash position.
6) When you have drawn the
required amount of water out of the clean water tank, turn valve
A back to the spray/circ position, and valve B back to the
spray/fill position.
7) Turn all the boom switches off
and the master sprayer switch on for a few moments - this will
flush out the return pipes back to the tank. Turn the master
switch off and the boom switches back on again.
8)You can then proceed to spray
the washings out on to your under-dosed area of the field.
9) When you have finished, the whole procedure should be repeated with the second half of the clean water.
It is outside the scope of this
manual to go through the complete nozzle selection procedure. You
should have been taught the ins and outs of spray quality, nozzle
selection procedures, volumes etc. during your sprayer operators
training, however the following notes should serve as a useful
reminder.
The recommended procedure for
calibrating this, or any other sprayer, is as follows:
1. Read label.
Check the label on the chemical
pack (or accompanying leaflet) for recommended volume of
application and spray quality (nozzle type and operating
pressure). Decide on application rate.
2. Calibrate speed.
The Frazier chassis unit is fitted
with an electronic speed meter, however, this will only be
accurate if the information programmed into it is correct. Please
see the chassis unit manual for the correct calibration
procedure.
The following procedure should be
used to double check the accuracy of the instrument.
a. Carry out a trial run to
establish a forward speed which gives an acceptable level of boom
stability and an appropriate gear and engine speed for the ground
and crop conditions. (see notes on page 13)
b. Carry out a check over a marked
distance of 100 metres, using the speed decided above. Measure
the time taken, in seconds, to cover this distance.
c. Establish the actual forward
speed from the formula: 360 ÷ Time in seconds = speed in km/h
d. Adjust engine speed and repeat check to get required forward speed.
3. Calculate Nozzle output.
a. Measure and record the nozzle
spacing. Frazier sprayers normally have a spacing of 0.5 metres.
b. Calculate and record the output per nozzle required to achieve the intended volume of application using the following formula:
Application volume (l/ha) X Speed (km/hr) X Nozzle spacing (m) ÷ 600 = Nozzle output (l/min)
4. Select and fit nozzles.
Refer to nozzle manufacturer's data charts or cards, or to MAFF lists, and select type and size of nozzle that will provide the calculated nozzle output and the spray quality required. Record the recommended spraying pressure for the required output.
5. Check nozzles.
a. Fill sprayer with CLEAN water,
start spraying and set pressure to the pressure decided above.
b. Check spray patterns and
alignment visually. Replace any faulty nozzles and re-check.
c. Compare the output of individual nozzles by use of either a nozzle flow meter or a calibrated recording jug. Replace nozzles with more than a ± 5% variation from the average.
6. Calibrate sprayer.
a. Using a calibrated jug, measure the output from at least four nozzles or at least one from each boom section, and compare with the calculated nozzle output.
b. if the output differs by a small amount from the calculated output, alter the pressure
accordingly and repeat the
calibration until you have established the correct pressure for
the required application rate.
c. If the output differs by a large amount, re-check calibration and calculations and change the nozzle size and/or forward speed if necessary.
Operating
The Frazier chassis unit is
capable of working at speeds in excess of 16 km/h, however, these
sort of speeds are very rarely suitable for crop spraying
operations. Speeds considerably higher than those used for
conventional tractor spraying can normally be used however, due
to the excellent boom stability of the Frazier sprayer. For most
spraying operations you should be able to spray at between 10 and
12 km/hr. When deciding working speeds, the following factors
must be taken into consideration:
a). Size, shape, contours of field
and obstacles - can you maintain your target speed?
b). Ground conditions - if the
whole field is wet or there are wet patches - again, can you
maintain your target speed? - you may have to consider taking
smaller tank loads if conditions are bad.
c). Application volume / spray quality - make sure you can get the required spray quality if you are using large jets and a high speed to get your required application rate.
d). Spray drift - Ensure that you
don't use too high a pressure with an undersized nozzle to get
your required application rate at a high speed.
e). Target - don't forget the
whole object of the crop spraying operation is to hit the target
weed or crop with the chemical. If the crop is dense and the
target is weeds in the bottom of the crop, then don't go too fast
or the spray will not penetrate.
f). Boom stability - It is most
important that the boom is stable whilst spraying. A boom that is
bouncing or yawing will cause uneven application, particularly at
the boom tips. This will be more noticeable with booms over 12
metres wide.
When you have decided your working
speed, have calibrated the sprayer and have become fully
acquainted with the operation of the chassis unit and the
sprayer, it is recommended that you practice in a suitable field
with clean water only. This is particularly important if you have
not driven a self-propelled sprayer before - there are an awful
lot of new things to get used to!
When spraying at relatively high speeds, it is very important that your working speed is maintained to avoid under or over dosing. It is important that two bouts are sprayed around the headland, when using a 12 metre boom, to give yourself plenty of time to turn the sprayer on and off. Maintain your working speed as you travel on to the headland and turn the sprayer off before you start turning. After turning, straighten up and accelerate to your target speed before switching on again. If you turn whilst spraying you will get considerable overdosing at the outside of the inner boom.
For the same reasons always
reverse into corners and accelerate as quickly as possible as you
switch the sprayer on - the motorised valves fitted on the
sprayer tend to be little slow building up to full pressure
which, of course, is a definite advantage in this situation.
If the sprayer is fitted with an
automatic spray rate controller,(RDS Delta 3/4) it is still
important to keep as near to your target speed as possible or the
spray quality will vary considerably.
When spraying potatoes and other
dense crops with row crops fitted, always try to travel in the
same direction each time you spray the field. The tops will then
tend to grow in that direction with very little damage caused. If
you change direction each time, you will find the tops are
dragged back the other way, causing considerably more damage.
Operating
| It should
only be normally necessary to run the engine at tick-over
to open and close the booms. The decal to show the operation of the boom controls (Fig. 17) is positioned in front of the levers. |
Fig.17 Manual spool controls - 24m boom |
| The
electro-hydraulic spool valve controls on the Stealth
are on the main control pod (Fig. 18). It will be necessary to run the
engine at approximately 1500.rpm to activate the
electro-spools, and up to 3000.rpm in some instances,
e.g. cold weather. The decal to show the operation of the boom is on the same control panel. |
Fig. 18 Electro spool switches |
|
Unfolding
| 1. Raise the boom to the
top of the height mast ensuring that the centre section
hits both the rubber
stops (Fig. 19). 2. Open the boom out to 12
metres "First fold". 3. Open boom out to full width "second fold" (if required). 4. Lower boom to working height. |
Fig. 19 Top of height mast and boom stops. |
| Folding 1. Make sure you are parked on level ground and are well clear of obstacles and overhead power cables. 2. Using the hydraulic tilt ram ensure that the boom is level. 3. Raise the boom to the
top of the height mast ensuring that the centre section
hits both rubber stops (Fig. 19). 4. Fold outer sections in to 12 metres. 5. Fold inner sections in until boom touches the vertical plates on the front boom rests. |
Fig. 20 Front boom rests |
| 6. Lower boom right down
into boom rests ensuring all the pressure is off the
hydraulics and it is
seated into the rear rests. On some variants the second fold rams may have a hydraulic break-back incorporated as a safety precaution. E.g. If the boom tips have been removed from the 24m boom for spraying at 20m. If the break-back is activated, the hydraulic pressure will be lost out of the second fold rams and so it is important to re-pressurise by activating the outer section lever or switch.
|
Fig. 21 Rear boom rests |
|
Boom Maintenance
Height mast
The height mast / sliding frame
should be kept well coated in oil or grease. If the mast dries up
you may experience difficulty in raising and lowering the booms
when they are in the folded position. The mast may need
lubricating daily if you are opening and closing the booms a lot,
especially if the weather is hot and you are working in dusty
conditions. The mast should be degreased periodically,
particularly after working in dusty conditions, and relubricated.
Grease nipples
The boom is fitted with grease
nipples on the majority of the pivot points. These should be
greased at least once a week. Any pivot points that are not
fitted with grease nipples should be oiled generously.
There is also a grease nipple on each yoke of the PTO shaft and a grease point on each end of the PTO shaft guard - again grease weekly.
Back frame lubrication points
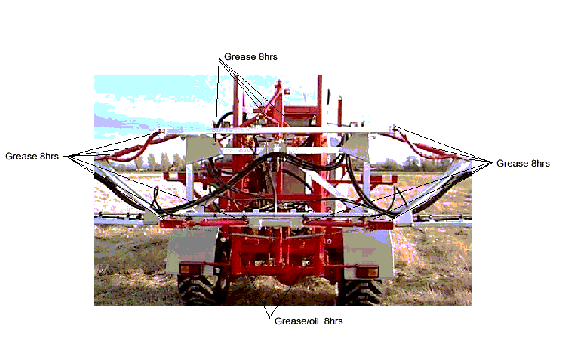
Fig. 22 Back-frame lubrication
points
Boom lubrication points
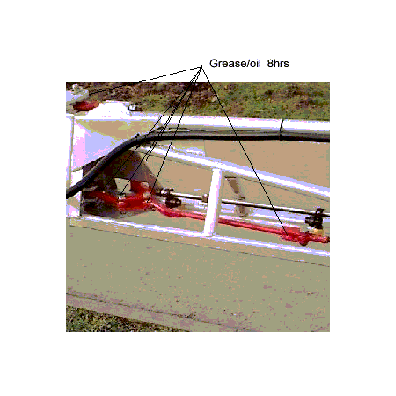
Fig. 23 Boom lubrication points
The main boom suspension sliding unit (shown in fig. 22) should be kept well coated in oil or grease.
Various areas of the boom may need
adjusting from time to time as wear naturally takes place. It is
important to keep the boom adjusted correctly to get the best
life and performance from it.
You should also thoroughly inspect
the boom from time to time for any signs of fatigue or cracking.
It is much easier to repair a cracked boom than it is a broken
one.
| Height mast / slide
frame It is
important that movement between the sliding frame and the
height mast should be kept to a minimum. If the movement
becomes too great the booms will not clear the front
supports by an adequate margin when you are folding them
in. There are nylon wear pads inbetween the height mast and slide frame, 4 at each side. Check that these are O.K.
then the slide frame needs adjusting by the two adjusting
slides fitted to the offside of the frame, one at the top
and one at the bottom (Fig. 24). |
Fig. 24 Slide frame adjusting bracket (top) |
Adjust as follows:
1) Slacken off the two set studs securing the top bracket to the frame.
2) Slacken off the locknut on the adjusting bolt.
3) Turn the adjusting bolt to push the slide bracket up to the height mast - do not over tighten.
4) Tighten the two securing studs and the adjuster bolt locknut.
5) Repeat with the lower bracket.
6) With the booms open lift the boom up and down to check that the carriage does not bind. If it does slacken the slides off slightly and try again.
Secondary fold rams
The second fold rams are part of a very complex system, and therefore should only be adjusted by a person qualified to do so.
| Main lift ram The main lift ram relies on a wire
rope to lift the boom, after a while this may stretch and
the back frame will not travel all the way to the top of
the height mast. It is easily adjusted by
shortening the threaded eye bolt shown in fig. 28.
It is recommended that the optional de-mount legs are used when removing the sprayer from the chassis unit. If you make your own legs ensure that they support the sprayer in such a way that it can't be pushed or blown over when it is removed. |
Fig. 28 Wire rope adjuster
|
| If you remove
the sprayer from the chassis unit when row crop wheels
are fitted it is advisable to lower it down on the jacks,
after de-mounting, to the lowest position to make it more
stable. When fitting
the de-mount legs ensure that the security pins are
fitted through the holes in the inside end of the legs so
that they can't slip out of their locating sockets. Be sure all services have been disconnected and the lowest point on the sprayer is well clearof the chassis before driving away.
|
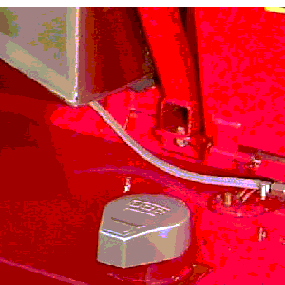 Fig. 29 De-mount point |
Maintenance and technical information.
The life of your sprayer will
depend on the care it receives throughout its life. It is the
operator's responsibility to ensure that the machine is not only
correctly operated, but also to ensure that any maintenance
operations outlined in this manual are carried out. Please
remember that you are obliged to keep your sprayer in top working
condition under the various Acts and codes of practice mentioned
on page 4. If you are unsure of how to carry out any of the
maintenance or repair operations, please do not hesitate to
enlist the help of your dealer or T.J. Frazier Ltd.
The sprayer should always be kept
clean and MUST be washed out daily whether you are using the same
chemical the next day or not.
DO NOT leave chemicals in the tank
overnight if you can possibly avoid it.
If your sprayer does not have the tank wash system fitted, particular care must be taken in washing the inside of the top of the tank, using a hosepipe and brush if necessary.
To get rid of any remaining traces
of chemical in the sprayer, it is generally better to wash it
through several times with relatively small amounts of water i.e.
100-200 litres than it is just to spray one large amount through.
For a thorough wash out, firstly
add about 200 litres of clean water to the sprayer and circulate
it whilst washing the inside of the tank with a hose. Then spray
the water out through the spray lines and finally drain out the
tank.
During the washing process direct the water through the chemical inductor for a while, and operate the flush ring, can-wash and flushing hose. Also turn the booster agitator on for a while, if you have not been using it, checking that the nozzles in the tank are not blocked. Whilst
spraying the water out of the tank
turn the boom section switches off for a few moments to flush out
the balanced return pipes back to the tank. It is important
that all the hoses on the sprayer are flushed through during the
cleaning process.
After the initial flush out repeat
the process adding some cleaning agent to the water and, when you
have finished, give it a final rinse through with clean water
again. Leave the pump running for a while with the tank drain
open each time to empty as much water as possible out of the
system. You cannot hurt the spray pump by running it dry.
If you have been spraying with a particularly "potent" or concentrated chemical, circulate a detergent mix through the sprayer and spray lines and leave to stand overnight. Before commencing spraying circulate the mix again, spray it out and then flush through twice more with
clean water remembering to ensure
that all the hoses are flushed through as above.
The outside of the sprayer should
also be cleaned down immediately after use.
Please remember to follow the Code
of Practice etc. when washing the sprayer out and disposing of
tank washings.
When you have finished, remove all the filters from the sprayer and check them for cleanliness. Clean them off with brush in a bucket of water if necessary and then replace.
Maintenance
It is most important that all the
components on the sprayer be protected from damage caused by
frost.
It is extremely difficult with
today's modern sprayers and complicated plumbing systems to drain
every last drop of water from the sprayer without disconnecting a
number of hoses. For this reason the most practical method of
frost protection, assuming you cannot store the sprayer in a
frost protected building, is to use motor vehicle anti-freeze.
1) Wash out the sprayer thoroughly
as on previous page and drain as much water out as possible.
2) Pour 10 litres of antifreeze
and 20 litres of water into the tank.
3) Run the pump and circulate the
mixture around the system, observing the notes on the previous
page about flushing all the hoses through (Inductor, can-wash,
agitator etc.)
4) Switch the sprayer on and spray the mix out through the spray lines to protect the filters, spray lines and nozzle bodies.
5) Before using the sprayer again flush the antifreeze out of the system with clean water.
| Whilst
holding the pipe the complete agitator assembly can be
unscrewed off the bottom and removed for cleaning.
|
Fig. 31 Removing the agitator nozzles |
|
Maintenance
Efficient filtration is essential
for successful crop spraying, especially with increasing use of
low-volume application techniques requiring the use of small
nozzles.
The Frazier sprayer is normally
fitted with a three stage filtration system. Firstly there is a
high capacity suction filter, followed by a pressure side filter
after the pump and finally, line filters fitted on the boom - one
for each boom section.
They should all be cleaned out at least once daily and each time you wash out to change chemicals. If you are spraying a particularly "sticky" chemical or wettable powders held in suspension you may have to clean some of the filters out more often. Experience will soon
tell you how often to clean them.
Not only is it most important that
the filtration system is kept clean and well maintained, but also
that the correct size mesh is used in each filter for the
different rates of flow and chemical used. Always read the
chemical container label for advice on filtration.
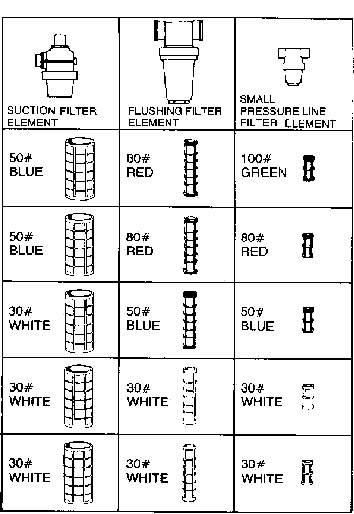
Filtration should be applied in three stages, starting with a coarse mesh, and progressing to finer sizes. In order to maintain efficient filtration without restricting liquid flow the screen area used should be as large as possible.
Use the chart below to establish which size element should be fitted in each filter for each
different nozzle used. Your nozzle
selection chart will show the nozzle output in litres/min for
each particular tip. The elements are all colour coded for easy
reference.
Nozzle output in litres/min at 3 Bar (flat fan,
standard pressure tips) 1.4 - 2.2 Over 3.4
litres / min |
 |
|
Main suction filter
The main suction filter is
situated alongside the pump on the back of the sprayer (fig. 33).
To remove the filter element
firstly turn the yellow cap anti-clockwise on the underside of
the filter bowl, unscrew the threaded ring, fig 33, and remove
together with the lower bowl . The element can then be removed
for cleaning. After cleaning reassemble ensuring the sealing ring
is correctly seated.
The bowl should not be removed
whilst there is chemical in the spray tank.
|
Fig. 33 Main suction filter |
|
Main pressure filter.
The main pressure filter is
situated on the back of the sprayer as shown in fig.34. It is a
flushable type of filter which means it can be flushed out at any
time without having to remove the bowl. (see below) When spraying
some chemicals it may be advisable to flush the filter out every
few tank loads.
The bowl should, however, be
removed periodically to inspect the element and to give it a
thorough clean. This time period will depend on what type of
chemicals you are using - please use your own judgement. It
should always be removed when giving the sprayer a thorough wash
out.
|
Fig. 34 Main pressure filter |
|
Maintenance
The spray pump
The spray pump fitted to your sprayer is a diaphragm type pump and may be one of several different types and/or sizes, however, the operation and maintenance is the samefor all of them.
Pressure relief valve
The pressure relief valve is fitted purely as a safety valve.
To set it up proceed as follows:
1) When you have finished calibrating the sprayer and setting it up for spraying with the size of jets that you intend to use, switch the sprayer on (with clean water only) and increase the spraying pressure with the electric pressure control to approx. 2 bar (30 psi) above your target spraying pressure.
2) Assuming that you can achieve this pressure (if you can't see 4 below), unscrew the pressure relief valve until the pressure just, and only just starts to drop. The "safety" pressure is then set.
3) The pressure can then be reduced again with the electric pressure regulator to your target pressure.
4) If you cannot reach this pressure screw in the pressure relief valve until the pressure increases to your "safety pressure". It is then set and the pressure can be reduced again to your target pressure.
Lubrication
The oil level should be kept up to
the mark on the transparent bowl on the top of the pump. It
should be topped up with a good quality 20W/30 motor oil.
Change the oil every 200 hrs or at the end of the season. There is an oil drain plug located at the base of the pump body. Rotate the pump shaft slowly by hand until the oil stops flowing.
Slowly refill, rotating the shaft
by hand again, until the level reaches the mark on the reservoir.
If the oil changes to a milky
colour this is a sign of water leaking into the oil through the
diaphragms - they should then be checked immediately.
It is good practice to overhaul the pump; replacing diaphragms, valves and seals at the end of each season if you spray large acreages.
The electric control unit for the
sprayer is a modular unit incorporating the boom section valves,
a master on/off valve, a proportional pressure regulator, a
manual agitator control valve and the RDS flow sensor (if fitted
with Delta 3/4).
| If boom
section valves are fitted with balanced return valves
they are described on page 8 along with the agitator control. The master on/off and the pressure
regulator are described on page 5. Details on all the incorporated RDS equipment are in the accompanying RDS manuals and in the back of this manual. Should one of the electric valves or the power supply to the control unit fail, the valves can be operated manually to "get you home".However, please check the fuses in the main fuse boxes first (see appropriate chassis unit manual). |
Fig. 39 Boom section valve, retaining clip. |
| Before
attempting manual operation the multi- pin electrical
connector which connects the sprayer to the chassis unit
must be disconnected, having first switched on all the
non offending valves. Remove the retaining clip
shown in fig. 39, and remove the orange motor vertically
(it may be a little tight). Insert a large screwdriver into the square cup and turn anti-clockwise, (Fig. 40) the valve will be fully on when it stops. |
Fig. 40 Boom section valve, manual operation. |
|
All the hoses on the sprayer
should be inspected periodically for any signs of deterioration.
Also check for any signs of chafing, particularly around the
areas of the height mast where the boom goes up and down.
Damaged or perished pipes should
be replaced without delay. The consequences of a high pressure
hose bursting can be quite serious.
Parts
All replacement parts are available
from your dealer or T.J. Frazier Ltd. Some parts are fairly
common and may also be available from other local sources. If you
require any parts information please do not hesitate to contact
either your dealer or ourselves.
A parts manual will soon be
available on request.
When ordering parts please give us as much information as possible including the following:
The model/build number - this is on a plate on the front offside of the chassis e.g. 5D354
The sprayer model and serial number, on a plate behind the main suction filter.
RDS Delta 3/4 automatic sprayer controller
The RDS Delta 3 or 4 automatic
sprayer controller may be fitted to your Frazier sprayer as
optional equipment. If it is, you will find the main operating
instructions in an accompanying RDS manual.
Instructions on how to calibrate
the chassis unit wheel circumference, the engine tachometer and
the PTO tachometer can be found in the RDS Delta 1 section of
your chassis unit manual.
The following notes on the Delta 3
are specific to the Frazier sprayer and should provide a further
useful reference.
The flow meter is fitted into a
hose between the main electric on/off valve and the boom section
valves. The hoses can be quite easily disconnected from each end
of the flow meter for periodic cleaning.
Before attempting to use the Delta
3/4 the pressure relief valve pressure and the main spraying
pressure must be set to approx. 2 bar (30 psi) above your target
pressure. These pressures must be set when the RDS valve is in
the fully closed position.
There after the pressure is only normally altered by depressing the + / - buttons on the head unit if the head unit is in manual mode, or if the dash board rocker switch is in manual mode, on the main sprayer control unit.